Pages

Showing posts with label WebDynpro. Show all posts

Sunday, January 1, 2012

Using the Button Choice UI Element in Web Dynpro ABAP

Create a Web Dynpro Component ‘ZDEMO_BTN_CHOICE’ in SE80.
Screen1:

On the View Context Tab create two attributes String1 and Result  of Type CHAR30.
Screen2: 
 
In your View on the Layout tab create an Input Field with Label
Screen3:
Bind the attribute String1 to the Input Box
Screen4:

Enter the Text to the Label element
Screen5:

Enter second input box with label element. Bind the Result attribute to the ‘INP_RESULT’ Input box. and enter the text for the label element.
Screen6:
Insert the element Button Choice
Screen7:

After inserting Button Choice element include the Insert Option by Right clicking on the element Button Choice
Screen8:
Create an OnAction Event ‘Up_to_Low’ for the option to convert the Upper Case String to the LowerCase.
Screen9:
After double clicking on the event read the input attribute String1 by using the code wizard (Ctrl+F7). Call the Function Module ‘STRING_UPPER_LOWER_CASE’ by using the pattern Button. And pass the output to the ‘Result’ attribute.  
Screen10:

By following the below step set the value to the result attribute
Screen11:

*** Generated code by Code Wizard and Patten buttons ***
method ONACTIONUP_TO_LOW .
** Declarations **
  DATA LO_EL_CONTEXT TYPE REF TO IF_WD_CONTEXT_ELEMENT.
  DATA LS_CONTEXT TYPE WD_THIS->ELEMENT_CONTEXT.
  DATA LV_STRING1 TYPE WD_THIS->ELEMENT_CONTEXT-STRING1.
  DATA LV_STRING TYPE STRING.
  DATA LV_RESULT TYPE WD_THIS->ELEMENT_CONTEXT-RESULT.
* get element via lead selection
  LO_EL_CONTEXT = WD_CONTEXT->GET_ELEMENT( ).
* get element via lead selection
  LO_EL_CONTEXT = WD_CONTEXT->GET_ELEMENT( ).
** To get the Input String **
  LO_EL_CONTEXT->GET_ATTRIBUTE(
    EXPORTING
      NAME =  `STRING1`
    IMPORTING
      VALUE = LV_STRING1 ).
** To Convert the string from UpperCase to Lowercase **
CALL FUNCTION 'STRING_UPPER_LOWER_CASE'
  EXPORTING
    DELIMITER       = '1'
    STRING1         = LV_STRING1
  IMPORTING
    STRING          = LV_RESULT.
** To Set the Value to the Result Input Box **
  LO_EL_CONTEXT->SET_ATTRIBUTE(
    NAME =  `RESULT`
    VALUE = LV_RESULT ).
endmethod.
By right clicking on the Button Choice UI Element include another Insert Option for reverse the string.
Screen12: 


Create an action method ‘Reverse’ for the Insert Option to reverse the string.
Screen13:
Insert the below code to Reverse the Input String
method ONACTIONREVERSE .
** Declarations **
  DATA LO_EL_CONTEXT TYPE REF TO IF_WD_CONTEXT_ELEMENT.
  DATA LS_CONTEXT TYPE WD_THIS->ELEMENT_CONTEXT.
  DATA LV_STRING1 TYPE WD_THIS->ELEMENT_CONTEXT-STRING1.
  DATA LV_STRING TYPE STRING.
  DATA LV_RESULT TYPE WD_THIS->ELEMENT_CONTEXT-RESULT.
* get element via lead selection
  LO_EL_CONTEXT = WD_CONTEXT->GET_ELEMENT( ).
* get element via lead selection
  LO_EL_CONTEXT = WD_CONTEXT->GET_ELEMENT( ).
** To get the Input String **
  LO_EL_CONTEXT->GET_ATTRIBUTE(
    EXPORTING
      NAME =  `STRING1`
    IMPORTING
      VALUE = LV_STRING1 ).
** To Reverse the input string **
CALL FUNCTION 'STRING_REVERSE'
  EXPORTING
    STRING          = LV_STRING1
    LANG            = 'E'
 IMPORTING
   RSTRING         = LV_RESULT.
** To Set the Value to the Result Input Box **
  LO_EL_CONTEXT->SET_ATTRIBUTE(
    NAME =  `RESULT`
    VALUE = LV_RESULT ).
endmethod.
Create an application to test the WD Component by right clicking on the component ‘ZDEMO_BTN_CHOICE’Web Dynpro Application. After creating an application our Component is ready for testing. Right Click on the application and select ‘Test’.
Screen14: 
 Enter the Input String and click on the Button Choice element and select the option ‘UpperCase to Lower Case’ for the execution.
Screen15:
Output after converting the string from Uppercase to Lower Case  
Screen16: 

After entering the Input string select the option ‘Reverse the String’.
Screen17:
Output of the Reversed String
Screen18:

Dialog boxes in WebDynpro ABAP

The Task
The starting point is the application for sending an e-mail. This application contains an input form for the e-mail addresses of the sender and the recipient, the subject, and the text.
The task of this tutorial is to assign functions to the To, Search (Google), and Send Email push buttons (see figure).
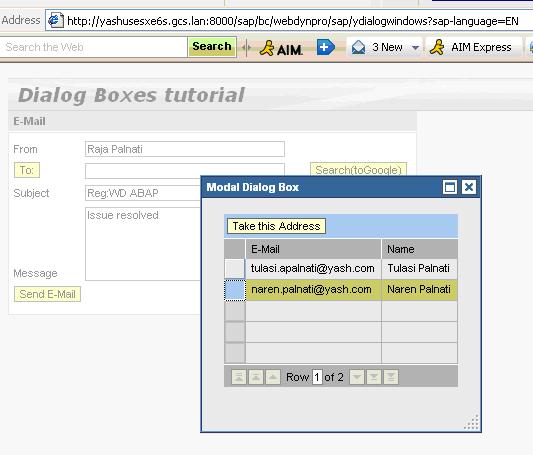
 If you choose to, a new Web Dynpro window containing a simple address book is displayed in a dialog box. If you select an address in this dialog box, this is written to the input field for the recipient address.
 If you choose Search (Google), an external window, which is assigned a URL address (for example, http://www.google.com), opens.
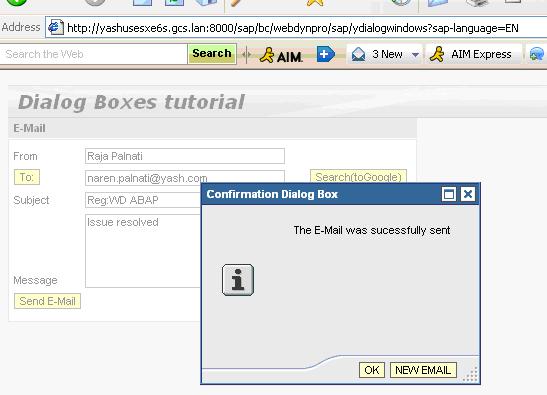
 If you choose Send Email, a confirmation dialog box containing two pushbuttons appears. Ok closes the dialog box and new email closes the dialog box and deletes the content of the input form.

Procedure:
Create a WebDynpro Component
1. Create a new WebDynpro component by the name YDIALOGWINDOWS and view name is   MAILVIEW
2. Create Web Dynpro Application by the name Ydialogwindows.


Create a Context to hold data in the component controller and define methods.
3. Double click on Component controller. Go to Context tab
4. Create Node Address book of cardinality 0..n with attributes Email and Name as of type String.
 5. Create Node EMailSetting of Cardinality 1..1 with attributes TOADDRESS,FROMADDRESS,MSGBODY,SUBJECT as of type String.
6. The Context of the controller looks as below:


7. Delcare the Global Variables gr_window of type IF_WD_WINDOW.
8. Delcare the Methods ShowAddressbookPopup and HideAddressBookPopup in the Component Controller which are should be called in views.
9. Copy and paste the below code into your methods.


Create New Window and View for Dialog box.
10. Create New Window with name ADDRESSBOOKWINDOW for addressbook Dialog box. Create New View with name ADDRESSBOOKVIEW


Design the Layout for EMAILVIEW and Bind the context to UI Elements
11. Drag and Drop the Context of controller to the EMAILVIEW Context. Design the layout as below.

12. Create an action ToAddress and bind to the To button. Create an action ToSearch and bind to Search button. Create an action SendMail and bind it to Sendmail button


 13. Copy the below codes to the action TOADDRESS, TOSEARCH and SENDMAIL.  


14. Create two actions for the Confirmation Dialog Box i.e., OK and NEW_EMAIL.  
 15. Copy the below code Onaction NEW_EMAIL.

 Design the Layout for ADDRESSBOOKVIEW and Bind the context to UI Elements
16. Drag and Drop the Context of controller to the ADDRESSBOOKVIEW Context. Design the layout as below.


 17. Create an action ADDRESSBOOK bind it to the Toolbar button
18. Copy the below Code to action ADDRESSBOOKVIEW.
19. Populate the static data to the Address book Table. Copy the below code into WDDOINIT() method of ADDRESSBOOKVIEW. 
20. Embed the ADDRESSBOOKVIEW into ADDRESSBOOKWINDOW.
 21. Save, Activate all the objects and Test it.  
   Output:
Fill the data of the screen as required.
  When you choose To, a dialog box displaying the address book appears
 If you complete the e-mail form and choose Send Email, the confirmation window appears.
 If you click on NEW EMAIL then it resets the form.
 When you choose Search (toGoogle), an external window displaying the Google homepage appears.