Pages

Saturday, December 31, 2011

Totals And Subtotals in ALV Webdynpros


 This is one more feature of ALV Which is shown here in ALV in Wendynpro as Totals and Subtotals Calculations.

Scenario: To create a dynamic ALV based on a SFLIGHT context node in Web Dynpro for ABAP and Display the TOTALS and SUBTOTALS in it.
This is a Webdynpro Application Explaining the Calculation of Totals in ALV Webdynpro.
First of all create a  webdynpro application  and introduce the alv component in the Used Component.


Now in the Component Usages add the component used...

  
Now in the Main window include the components in the Properties ...
  
Now create the node and its attribute.

 
Do the mapping of the node to the Data.Take Care for the Cardinality b'coz if the Cardinality is not proper it gives a runtime error for cardinality.


Now in the Layout Create the View Container in Which the ALV will be displayed.

  
Now in the Methods tab in the WDDOINIT do the coding for the ALV.
First Binding the Data to the ALV Table and then instantiating the ALV and then Coding to display the Total in ALV.  

 Read the Node as above and then code.....
 DATA lo_nd_sflight TYPE REF TO if_wd_context_node.
   DATA lo_el_sflight TYPE REF TO if_wd_context_element.
   DATA ls_sflight    TYPE        wd_this->elements_sflight.
 data:
  lr_comp_alv    type ref to if_wd_component_usage,
  lr_comp_if_alv type ref to iwci_salv_wd_table,
  lr_config      type ref to cl_salv_wd_config_table.
  data: lr_column_settings type ref to if_salv_wd_column_settings,
        lr_column          type ref to cl_salv_wd_column,
        lr_column_header   type ref to cl_salv_wd_column_header.
  data : lt_column type salv_wd_t_column_ref,
         ls_column type salv_wd_s_column_ref.
  data:  lr_field_amnt type ref to cl_salv_wd_field.
  data: lv_aggr_rule   type ref to cl_salv_wd_aggr_rule.
  data: lr_sort_rule   type ref to cl_salv_wd_sort_rule.
  data  fs_flight      like line of ls_sflight.
*     navigate from <CONTEXT> to <SFLIGHT> via lead selection 
  lo_nd_sflight = wd_context->get_child_node( name = 'SFLIGHT' ).
*& Fetch flight  data from database table
  select mandt
         carrid
         connid
         fldate
         price
         currency
         planetype
         seatsmax
         seatsocc
    from sflight
    into corresponding fields
    of   table ls_sflight.
  call method lo_nd_sflight->bind_table( ls_sflight ).
*... ALV Component Usage
  lr_comp_alv = wd_this->wd_cpuse_alv_test2( ).
  if lr_comp_alv->has_active_component( ) is initial.
    lr_comp_alv->create_component( ).
  endif.
  lr_comp_if_alv = wd_this->wd_cpifc_alv_test2( ).
*... Configure ALV
  lr_config = lr_comp_if_alv->get_model( ).
 call method lr_config->if_salv_wd_table_settings~set_selection_mode
    exporting
      value = cl_wd_table=>e_selection_mode-multi_no_lead.
*... ALV Component Usage
  lr_comp_alv = wd_this->wd_cpuse_alv_test2( ).
  if lr_comp_alv->has_active_component( ) is initial.
    lr_comp_alv->create_component( ).
  endif.
  lr_comp_if_alv = wd_this->wd_cpifc_alv_test2( ).
*... Configure ALV
 wd_this->lr_config = lr_comp_if_alv->get_model( ).
* display columns in correct order
  lr_column_settings ?= wd_this->lr_config.
  lt_column = lr_column_settings->get_columns( ).

loop at lt_column into ls_column.
    case ls_column-id.
      when 'PRICE'.
* aggregate field
        call method lr_config->if_salv_wd_field_settings~get_field
          exporting
            fieldname = 'PRICE'
          receiving
            value     = lr_field_amnt.
* create aggregate rule as total
        call method lr_field_amnt->if_salv_wd_aggr~create_aggr_rule
          exporting
            aggregation_type = if_salv_wd_c_aggregation=>aggrtype_total
          receiving
            value            = lv_aggr_rule.
    endcase.
endloop.
endmethod.
Now, in the Window add the View Container and the ALV Table in it.

  After the Window work is done create a Webdynpro Application for the Program.


Save and Activate the Total Program and test the Application.
The Total is Show for the Price As Below.

After you click the Sort the Subtotals are shown as Below.


This is all About the Totals and Subtotals in ALV Webdynpros.

SMARTFORMS Creation

SMART FORMS:
CREATION:-
1. TRANSACTION CODE - SMARTFORMS
2. ENTER FORM NAME AND PRESS ENTER.
3. GIVE DESCRIPTION .

4. CLICK ON GLOBAL SETTINGS.
5. DOBLE CLICK ON FORM ATTRIBUTES. CHECK GENERAL ATTRIBUTES AND OUTPUT CONDITIONS.
6. DOUBLE CLICK ON FORM INTERFACE AND CHOOSE TABLES.
7. FILL THE INTERNAL TABLE NAME, TYPE AND ASSOCIATED TYPE.
8.DOUBLE CLICK ON GLOBAL DEFINITIONS.
FILL PARAMETER NAME , TYPE AND ASSOCIATED TYPE. AND SAVE IT.
9. DOUBLE CLICK ON PAGES AND WINDOWS. RIGHT CLICK, CREATE GRAPHICS. GIVE NAME AND SELECT IT.
 
10.RIGHT CLICK ON GRAPHIC 1 AND CREATE ON WINDOW AND CREATE TEXT FOR IT.
11.RIGHT CLICK ON MAIN WINDOW. AND CREATE TABLE.

12. CLICK ON TABLE AND SELECT DETAILS ? TABLE. AND .SELECT PENCIL AND DRAW 6 COLUMNS.

13.CLICK ON HEADER AND CLICK ON %ROWS.
KEEP CURSOR ON EACH CELL AND RIGHT CLICK ?CREATE?TEXT.
CLICK ON TEXT , SELECT GENERAL ATTRIBUTES.
FILL THE COLUMN NAMES.
14.RIGHT CLICK ON MAIN AREA. ? TABLE LINE?SELECT DEFAULT TABLE LINE.

15.RIGHT CLICK ON EACH CELL AND CREATE TEXT.
16.CLICK ON FIELD LIST BUTTON IN APPLN TOOLBAR. CLICK ON GLOBAL DATA. TABLE FIELDS WILL BE LISTED.
17.DOUBLE CLICK ON TABLE AND SELECT DATA
FILL THE OPERAND , WHERE CONDITION AND SORT ORDER.
18.SELECT THE FIELDS WHAT EVER U WANT ONE BY ONE AND DRAG IT AND PUT IT IN EACH FIELD OF ROW2 CELLS.

19.SAVE AND ACTIVATE .
20.NOTE DOWN THE FUNCTION MODULE NAME-ENVIRONMENT? FUNCTION MODULE NAME)
21.GOTO ABAP EDITOR. WRITE ONE PROGRAM.
REPORT ZVENN_SMARTFORM_LFA1_1 .
TABLES LFA1.
DATA : IT_TAB TYPE TABLE OF LFA1,
FM_NAME TYPE RS38L_FNAM.
SELECT-OPTIONS LIFNR FOR LFA1-LIFNR.
select * from LFA1 into table it_TAB where LIFNR in LIFNR.
CALL FUNCTION 'SSF_FUNCTION_MODULE_NAME'
EXPORTING
FORMNAME = 'ZVENN_SMARTFORM_LFA1'
IMPORTING
FM_NAME = FM_NAME
EXCEPTIONS
NO_FORM = 1
NO_FUNCTION_MODULE = 2
OTHERS = 3.
CALL FUNCTION FM_NAME
TABLES
IT_LFA1 = IT_TAB
EXCEPTIONS
FORMATTING_ERROR = 1
INTERNAL_ERROR = 2
SEND_ERROR = 3
USER_CANCELED = 4
OTHERS = 5.
OUTPUT:


TABLE MAINTENANCE GENERATOR & ITS EVENTS


TABLE MAINTENANCE GENERATOR &amp;ITS EVENTS

TABLE MAINTENANCE GENERATOR &amp; ITS EVENTS
What is table maintenance generator?
Table Maintenance Generator is a tool used to customize the tables created by end users and can be changed as required, such as making an entry to that table, deleting an entry etc.
In other words, table maintenance generator is a user interface tool which is used to change the entry of the table or delete an entry from the table or create an entry for the table.
Prerequisite
To make this feature work care should be taken while creating the database table that in the 'Delivery &amp; Maintenance' tab, the 'Table View Maint.' should have the "Maintenance allowed" property defined.


Transaction Codes
SE54: Generate Table Maintenance Dialog
SE55: Table view maintenance DDIC call
SE56: Table view display DDIC call
SE57: Deletion of Table Maintenance
SM30: Maintenance Table Views:
Implementation of table maintenance generator for a custom table
Go to SE11 and create a table with the fields as per the requirement.
In table change mode, click on Utilities and then click on Table maintenance generator.

Following screen will be displayed for setting up the Maintenance generator


Following are the available options, choose them accordingly
Authorization Group : If the table needs to be maintained by only particular group of people, then the Authorization group needs to be filled otherwise fill it as &amp;NC&amp;. To maintain the authorization group refer to SU21.
Function group is the name to which the generated maintenance modules will belong to.
Generally Function Group name can be same as table name.
Maintenance screens: Maintenance can be done in 2 ways
1. Maintenance &amp; Overview both on one screen
2. Maintenance on one screen and Overview on another screen.
Provide the desired screen numbers.
After saving the changes, go to SM30 for maintaining the table.


Modifications Available in Table Maintenance
The Function Group created will be having the code and screens used in maintenance.
We can alter the way Maintenance data and screens are viewed by making the appropriate changes in the Function Group and its screens.
Screen Alterations
Maintenance screen can be altered in a way that, if a field needs to be non-editable or default name appearing on the maintenance screen for any field needs to be changed then following steps can be used to do the same
Go To Environment -&gt; Modification -&gt; Maintenance Screens


A field can be made non editable by simply unchecking that input checkbox for that field.

So the maintenance screen will appear like the one below

Similarly, the screen name of any of the fields appearing on the maintenance window can also be changed by changing the Name on the layout window of that field.


Table Maintenance Events
The value to be displayed on the maintenance screen for any field can also be altered as per the requirement like for every new entry in the table one of the field should have the constant value appearing automatically. For this purpose, the event needs to be chosen which performs the action. In this case event "05 creating a new entry".
List of Events available in Table maintenance
01 Before saving the data in the database
02 After saving the data in the database
03 Before deleting the data displayed
04 After deleting the data displayed
05 Creating a new entry
06 After completely performing the function 'Get original'
07 Before correcting the contents of a selected field
08 After correcting the contents of a selected field
09 After getting the original of an entry
10 After creating the header entries for the change task (E071)
11 After changing a key entry for the change task (E071K)
12 After changing the key entries for the change task (E071K)
13 Exit editing (exit main function module)
14 After lock/unlock in the main function module
15 Before retrieving deleted entries
16 After retrieving deleted entries
17 Do not use. Before print: Event 26
18 After checking whether the data has changed
19 After initializing global variables, field symbols, etc.
20 after input in date sub screen (time-dep. tab. /views)
21 Fill hidden fields
22 Go to long text maintenance for other languages
23 Before calling address maintenance screen
24 After restricting an entry (time-dep. tab./views)
25 Individual authorization checks
26 Before creating a list
27 After creation or copying a GUID (not a key field)
28 After entering a date restriction for time-dep. views
AA Instead of the standard data read routine
AB Instead of the standard database change routine
AC Instead of the standard 'Get original' routine
AD Instead of the standard RO field read routine
AE Instead of standard positioning coding
AF Instead of reading texts in other languages
AG Instead of 'Get original' for texts in other languages
AH Instead of DB change for texts in other languages
ST GUI menu main program name
AI Internal use only
For selecting the events follow the path as
Environment -&gt; Modification -&gt;; Events


Click on New Entries tab and Choose 05.

In form routine enter "FETCH_VALUE" and click on EDITOR.

Go to the events and in the form routine: FETCH_VALUE, write the desired code:
Like : ZCHC_ORD_REL-SYUNAME = sy-uname.
Check the same by adding some entries through SM30:


Add a Transaction to the Table with Table Maintenence Generator

This Page will help you to create a transaction for the table maintenance generator
which can be used to add entries and do modifications through it.


after you have finished making the table.......

Go to the utilities tab......and in that....go to the table maintenance Generator...


after this you come to the transaction sm30....

Enter the highlighted fields.
Making the Function Group is must......accordingly the programs will be generated internally...
You can make it a single step as well as two steps also...
in the single step you can enter the values on the on screen wherees in the twp steps if you double click on new entries a other screen comes where you can individually create the paricular entries....
The screen numbers for the both screen are to be assigned if two steps radiobutton is checked otherwise only overview screen number is required.
After doing this ,
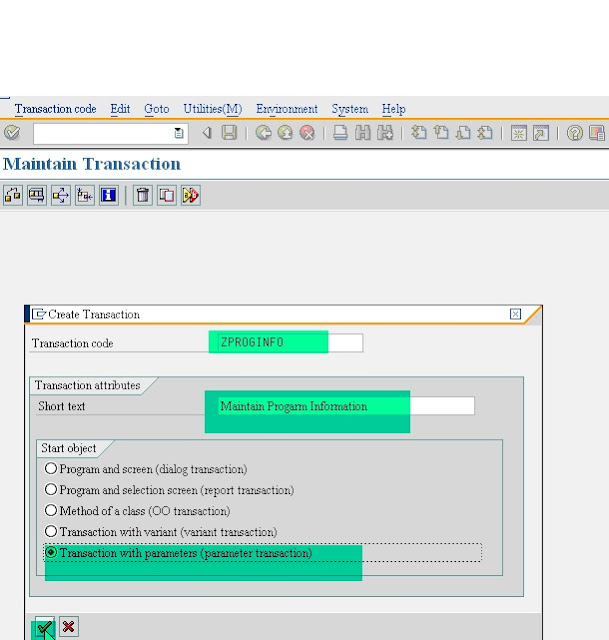
go to se93 transaction to maintain transaction.....
Enter the transactiopn name that you want to create....


as shown...

and then you come on the pop-up screen where you need to enter these information...


then.....


Now ,save your transaction.....
you can now use this transcation to maintain the table.